After my troubleshooting post went up (post87521.html#p87521) I have now managed to hook everything up successfully to my factory head unit. It is the same as a regular install, except you also need to connect a line out converter and also find a 12v ignition feed for the remote cable (joy). Steps below (with pictures to follow- when i get the time!)
Equipment needed:
- Amplifier (duh)
- Subwoofer (duh?)
- Amp Wiring Kit (AMP Power cable, Ground Cable, Remote Cable, RCA Audio Cable, In-line fuse)
- Line-out converter (https://www.halfords.com/webapp/wcs/stores/servlet/product_storeId_10001_catalogId_10151_productId_186391_langId_-1_categoryId_165626)
- Terminal Connector Blocks (https://www.halfords.com/webapp/wcs/stores/servlet/product_storeId_10001_catalogId_10151_productId_753575_langId_-1_categoryId_255229)
- In-line Fuse Holder (https://www.halfords.com/webapp/wcs/stores/servlet/product_storeId_10001_catalogId_10151_productId_177735_langId_-1_categoryId_165626)
- Assorted Mini Fuses/30AMP fuse
- Speaker Cable
Quick Guide (Work-In-Progress with pictures to follow when I get time)
Remove the battery -ve terminal before starting to hook up any new live feeds
1) Hook the AMP power cable to the battery, connecting the fuse in line with the wire close to the battery, run the cable through the rubber boot you can locate through the passenger side footwell under the carpet
2) For the Remote Wire- Access the 12v cigarette lighter cable and cut the yellow wire. Attach a terminal block to the end. Connect in to the other end of the terminal block the first end of the in-line fuse holder wire (remember to place a fuse into the holder, 30AMP will more than do). Also connect into the terminal block (along with the first end of the in line fuse holder) the yellow wire loose from the back of the cigarette lighter socket so that you reconnect it for use. With the 2nd end of the in-line fuse holder wire attach this using a terminal block to the Remote Wire. The cigarette lighter only turns on when the ignition is on, therefore in turn your amp/subwoofer will only turn on in the same pattern. Run the Remote Wire up through the centre console/behind the stereo and under the carpet of the passenger side footwell.
3) You now need to run the AMP power cable and remote wire from the passenger footwell down the side of the car to the boot, this can easily be done by pulling off the rubber seal around the bottom door edge to give space for you to run the cable through the bottom door plastic panel.
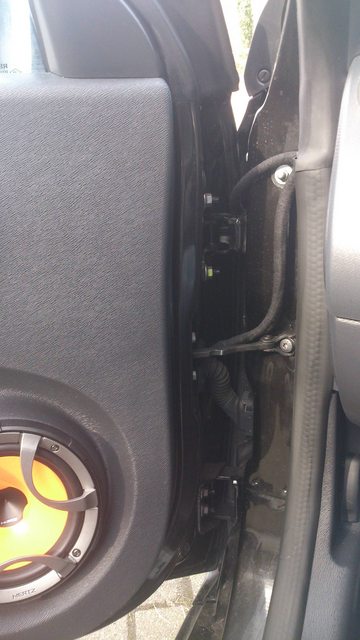
4a) Now for the audio feed for the amp (this next step assumes you have rear speakers). Remove the rear side panels to access the rear speakers. Splice into the speaker wires and run a length of speaker cable to the boot. Do the same for the opposite side, remembering which speaker cable is positive/negative and which is for left or right. You now need to attach the positive and negative wires for both left and right speaker feeds (4 cables) into the corresponding 4 ends of your line-out converter. Lastly attach the remaining ground cable on the line out converter to a suitable ground point (which I have yet to find, currently I have this wedged into the springy bolt mechanism under the sliding independent rear seat :/. The ground cable may also be short so you might want to extend it. You may also need to grind down the paint around the bolt hole to show bare metal for a true ground. Attach the RCA audio cable to the other end of the line out converter ready for the other end of the RCA cable to be attached to the amp in step 6.
4b) Alternative to the above/or if you don't have rear speakers, you can install the line-out converter (LOC) behind your head unit (which I think is actually the conventional way!) Splice into the required speaker wires behind the head unit and using additional speaker wire feed them into the line-out converter. Also splice into the ground cable behind your head unit to attach the line out converter ground cable (i think?). I attached the LOC to the rear speakers as I weren't sure which cables were which behind the head unit.
5) We now need to attach the ground cable for the amp itself. Remove the bolt from back of the rear light cluster, remove the light. Using sand paper, sand down the paint work around the bolt hole in order to show bare metal. Replace the light cluster, place the ground cable in between the bolt and tighten securely.
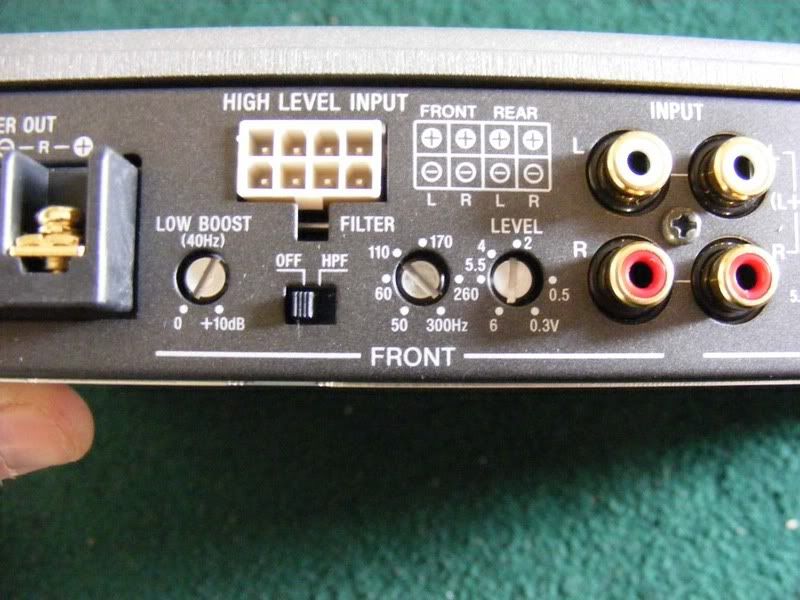
6) We should now have in the boot loose ends of the RCA audio cable (that comes out from the now wired line out converter), amp ground cable, amp power cable and remote wire. Attach all cables to the corresponding connectors on your amp. Connect your amp to your subwoofer noting positive and negative, also using suitable speaker wire that is the appropriate gauge/thickness.
7) Voila! You're done! Now to adjust the amp/bass settings to your taste. As a tip- I found using the head units 'fader' audio settings helped to increase or decrease the subwoofer level, not ideal as it means you are adjusting the power of the rear side speakers along with this, but I hardly have rear passengers anyway.
If I have missed any steps out please let me know below so I can edit.
Equipment needed:
- Amplifier (duh)
- Subwoofer (duh?)
- Amp Wiring Kit (AMP Power cable, Ground Cable, Remote Cable, RCA Audio Cable, In-line fuse)
- Line-out converter (https://www.halfords.com/webapp/wcs/stores/servlet/product_storeId_10001_catalogId_10151_productId_186391_langId_-1_categoryId_165626)
- Terminal Connector Blocks (https://www.halfords.com/webapp/wcs/stores/servlet/product_storeId_10001_catalogId_10151_productId_753575_langId_-1_categoryId_255229)
- In-line Fuse Holder (https://www.halfords.com/webapp/wcs/stores/servlet/product_storeId_10001_catalogId_10151_productId_177735_langId_-1_categoryId_165626)
- Assorted Mini Fuses/30AMP fuse
- Speaker Cable
Quick Guide (Work-In-Progress with pictures to follow when I get time)
Remove the battery -ve terminal before starting to hook up any new live feeds
1) Hook the AMP power cable to the battery, connecting the fuse in line with the wire close to the battery, run the cable through the rubber boot you can locate through the passenger side footwell under the carpet
2) For the Remote Wire- Access the 12v cigarette lighter cable and cut the yellow wire. Attach a terminal block to the end. Connect in to the other end of the terminal block the first end of the in-line fuse holder wire (remember to place a fuse into the holder, 30AMP will more than do). Also connect into the terminal block (along with the first end of the in line fuse holder) the yellow wire loose from the back of the cigarette lighter socket so that you reconnect it for use. With the 2nd end of the in-line fuse holder wire attach this using a terminal block to the Remote Wire. The cigarette lighter only turns on when the ignition is on, therefore in turn your amp/subwoofer will only turn on in the same pattern. Run the Remote Wire up through the centre console/behind the stereo and under the carpet of the passenger side footwell.
3) You now need to run the AMP power cable and remote wire from the passenger footwell down the side of the car to the boot, this can easily be done by pulling off the rubber seal around the bottom door edge to give space for you to run the cable through the bottom door plastic panel.
4a) Now for the audio feed for the amp (this next step assumes you have rear speakers). Remove the rear side panels to access the rear speakers. Splice into the speaker wires and run a length of speaker cable to the boot. Do the same for the opposite side, remembering which speaker cable is positive/negative and which is for left or right. You now need to attach the positive and negative wires for both left and right speaker feeds (4 cables) into the corresponding 4 ends of your line-out converter. Lastly attach the remaining ground cable on the line out converter to a suitable ground point (which I have yet to find, currently I have this wedged into the springy bolt mechanism under the sliding independent rear seat :/. The ground cable may also be short so you might want to extend it. You may also need to grind down the paint around the bolt hole to show bare metal for a true ground. Attach the RCA audio cable to the other end of the line out converter ready for the other end of the RCA cable to be attached to the amp in step 6.
4b) Alternative to the above/or if you don't have rear speakers, you can install the line-out converter (LOC) behind your head unit (which I think is actually the conventional way!) Splice into the required speaker wires behind the head unit and using additional speaker wire feed them into the line-out converter. Also splice into the ground cable behind your head unit to attach the line out converter ground cable (i think?). I attached the LOC to the rear speakers as I weren't sure which cables were which behind the head unit.
5) We now need to attach the ground cable for the amp itself. Remove the bolt from back of the rear light cluster, remove the light. Using sand paper, sand down the paint work around the bolt hole in order to show bare metal. Replace the light cluster, place the ground cable in between the bolt and tighten securely.
6) We should now have in the boot loose ends of the RCA audio cable (that comes out from the now wired line out converter), amp ground cable, amp power cable and remote wire. Attach all cables to the corresponding connectors on your amp. Connect your amp to your subwoofer noting positive and negative, also using suitable speaker wire that is the appropriate gauge/thickness.
7) Voila! You're done! Now to adjust the amp/bass settings to your taste. As a tip- I found using the head units 'fader' audio settings helped to increase or decrease the subwoofer level, not ideal as it means you are adjusting the power of the rear side speakers along with this, but I hardly have rear passengers anyway.
If I have missed any steps out please let me know below so I can edit.
")