Front brake pad replacement guide - RS133

Twingo Forum

Help Support Twingo Forum:

This site may earn a commission from merchant affiliate links, including eBay, Amazon, and others.

singlespeed

Well-known member
Joined
Feb 6, 2011
Messages
6,385
Reaction score
2
Location
Moray
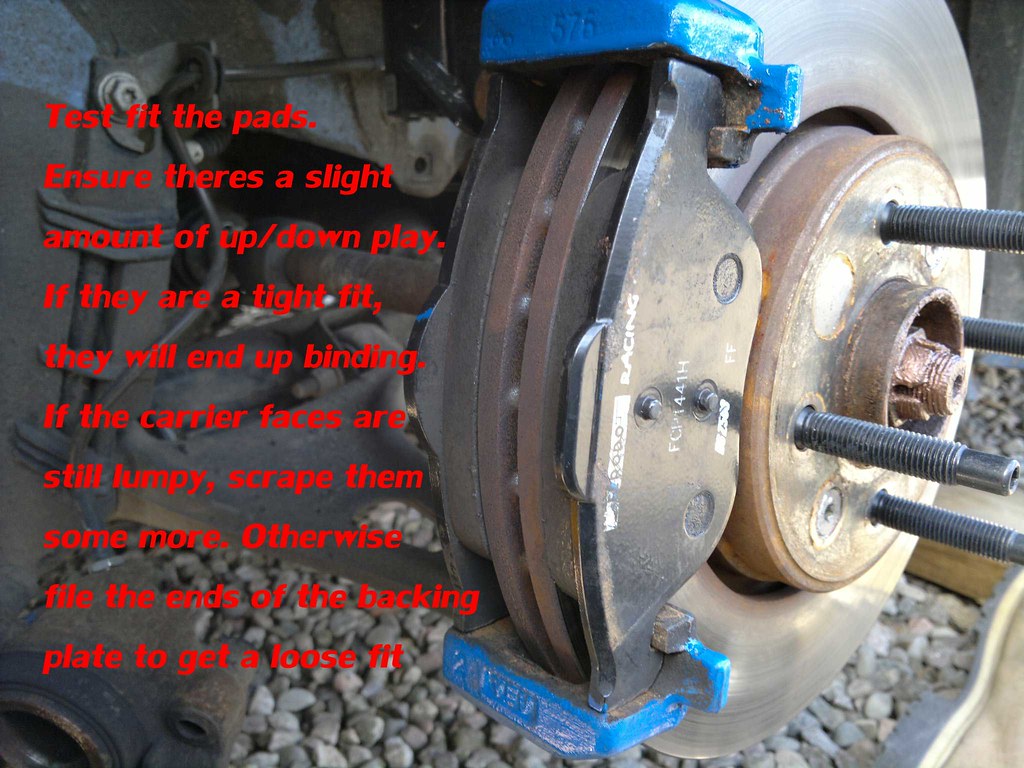
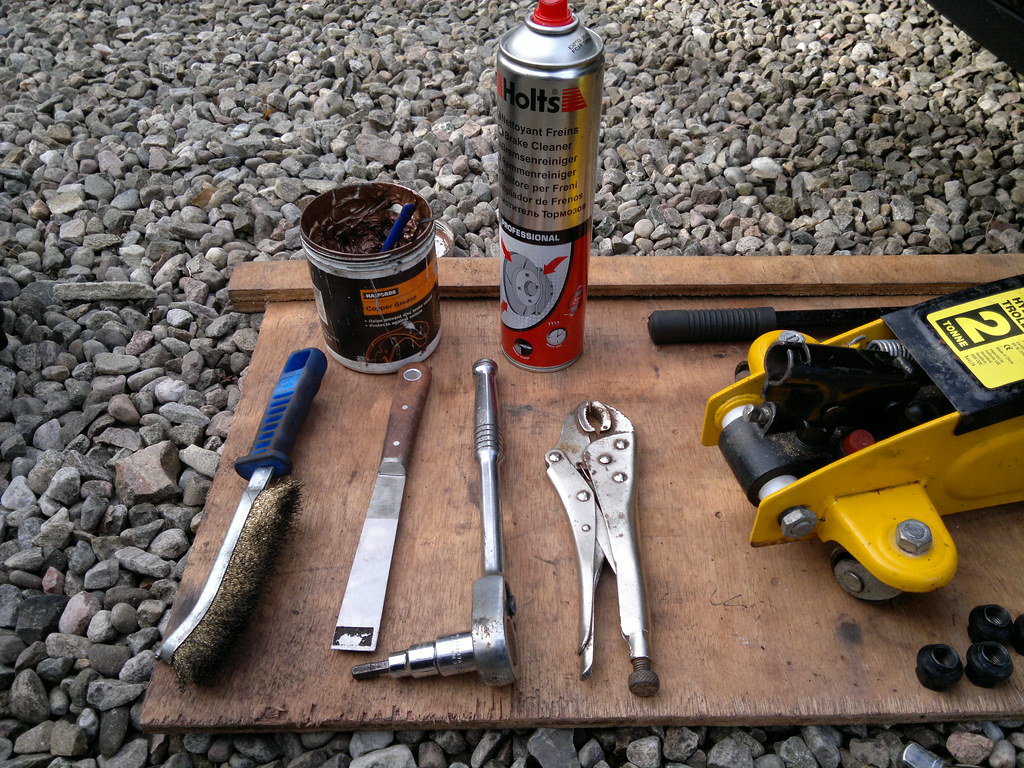
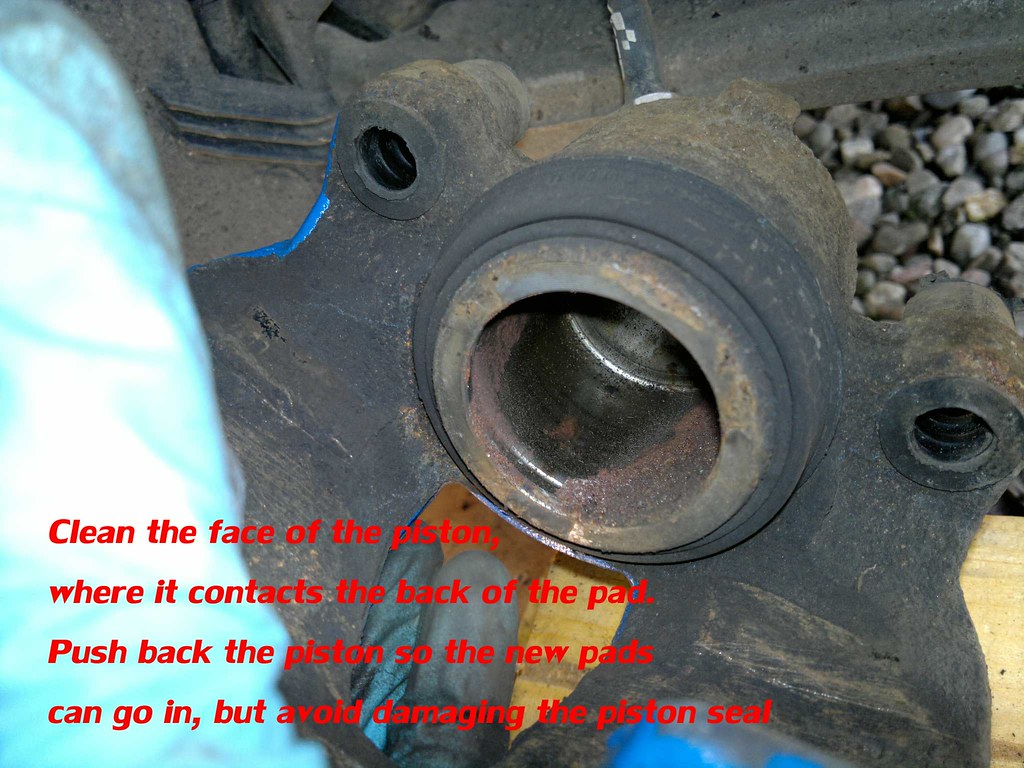
I wasn't changing the pads, just cleaning them up after developing an annoying squeak. So, the same nearly new pads were going back in. If your changing worn pads for new ones, add a G-clamp or large pair of water pump pliers to the list to push back the caliper piston.

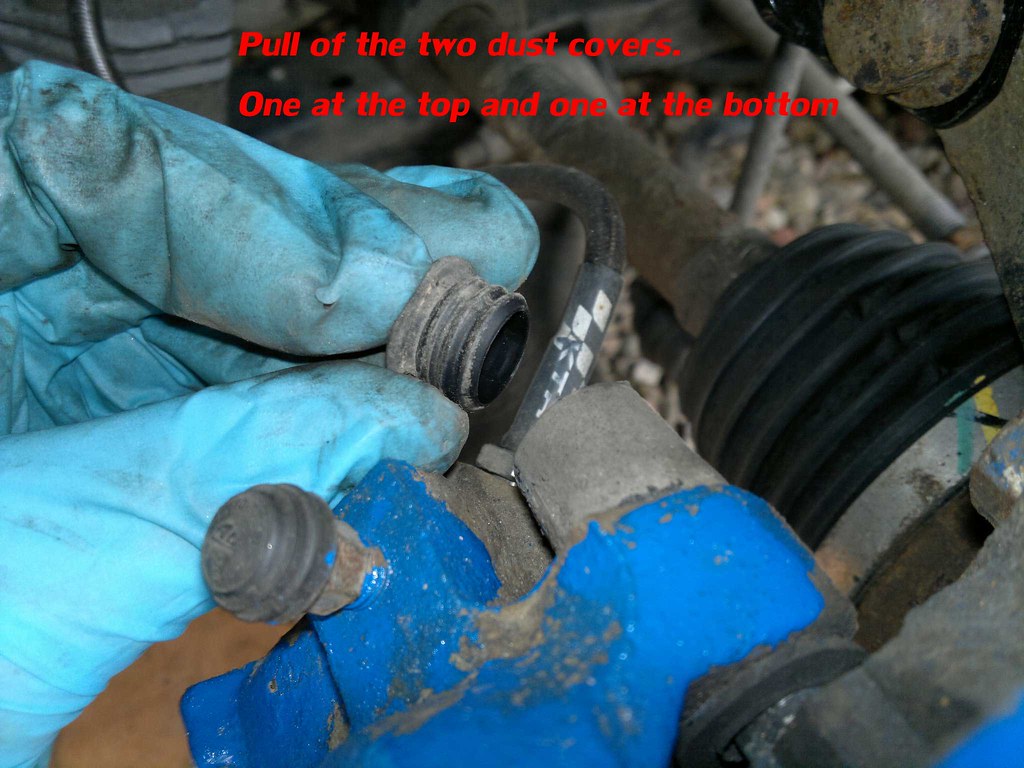
Open the bonnet and slacken the cap on the brake reservoir. This allows any fluid pressed back from the caliper to come easily back to the reservoir.

8713213399_1cc2804d4f_b_d.jpg


8713211787_36783cbe21_b_d.jpg


8714333896_6a9da8e51f_b_d.jpg


8713210849_d3e2e4e7f7_b_d.jpg


8713210405_d686a13f1d_b_d.jpg


8713209933_0e2a26b11c_b_d.jpg


8713209535_66d8834da6_b_d.jpg


8714331816_fb101fab90_b_d.jpg
 
8713208739_e4b22f90e6_b_d.jpg


8714330976_1c4c1db590_b_d.jpg


8713207729_48efc1ab73_b_d.jpg


8713207247_af25d39b74_b_d.jpg


8714329476_e12f947e29_b_d.jpg


Refit the wheel and lower back down to the ground

Torque wheel bolts to 105Nm

Press the brake peddle untill the peddle goes hard before driving anywhere.
Check the reservoir fluid level and refit the cap.

A couple of slow stops to make sure theres no clunks or bangs and everything feels right :?

All done :cool:
 
Doing mine this week, as well as the annoying clunk the drivers side front rear pad has worn out.

As Maggi said discs next!!
 
The only thing I didn't do this weekend when I did mine was put any copper grease on the piston where it touches the pad as i wasn't too sure what the effect would be on the rubber? So i left it.
 
maggi112":2hlbs0yg said:
Up next... Discs :p
I thought that after I'd finished :lol:

Extra tools
Torx bit to remove disc screw
19-22mm sockets (not sure which)
Breaker bar as the bolts will be tight
Thread lock or new bolts

Disc removal
To get the disc off, you would need to remove the pad carrier bracket (Two bolts probably 19-22mm)
Undo the small retaining screw that holds the disc onto the hub.
Thoroughly clean the hub spigot to allow the disc to come free from the hub.
Clean the hub face which was covered by the disc as any dirt or rust here may make the disc run out of true.
start to re-assemble :)

Disc assembly
A bit of copper grease around the hub spigot will ease the removal of the disc next time.
Thoroughly clean the disc with brake cleaner and put it onto the hub, securing with the small screw
Make sure the points where the bracket bolts onto are clean, so the bracket sits correctly.
Use new bolts :? or reuse the originals with some thread lock and refit the bracket
 
thx for tutorial !
I realised I skip some point ^^ (but my system was clean as new) (dry road on south of france)
 
I forgot to mention Neil, when I stripped my brakes the front passenger side, outside brake pad was really stuck in the carrier. It took a lot of gentle persuasion to get it to slide out. The inner pad was fine as was both the inner and outer on the drivers side.

Would that have been causing any issues? I cleaned it with a wire brush and then it slid in and out easily when I replaced the pad after cleaning.
 
markhardy":xkf1c402 said:
I forgot to mention Neil, when I stripped my brakes the front passenger side, outside brake pad was really stuck in the carrier. It took a lot of gentle persuasion to get it to slide out.

Would that have been causing any issues?
If left, theres potential for the pad to wear quicker than it should and maybe even bind to the point where its stuck on enough to start overheating.

Obviously theres a fair amount of force clamping the pads down onto the disc, but only the runout of the disc and a fraction of movement of the piston seal retracting the piston, to knock the pads back from the disc face. Hence the pads need to be free to move and have a bit of rattle space when fitting them
 
Great how to this, thanks will be using it in next couple of weeks! Could do with a disc one now! Would do it myself but there will just be pictures of me getting angry!
 
The discs are really easy, just start the process of taking the pads off, then take off the two carrier bolts (17mm), To then take the disc off i had 2 T25 (i think) holding bolts, then voila the disc is off :D

To put everything back together just reverse the above steps :D
 
I tried changing my front pads the other day, took the guiding pins out and everything as above but i couldnt get the caliper off, it moved but appeared to be catching on something, any ideas? Cheers
 
Mine did the same, i just kept on wobling them, tried to prise them away with screwdrivers, eventually it just came off!
 
Give it a little tappy. Tap Tap Taparoo.
Mine was the same, eventually it came away after rocking it about for a bit
 
If theres a lip on the disc, you will need to push the caliper piston in sufficiently so the pads can slip over the lip and off the disc.

Don't go ramming a screw driver down next to the piston as you will probably damage the piston seal boot.
With a lever (flat blade screw driver) lever the caliper against the pad carrier bracket where the retaining spring normaly goes between the two bits. A bit top and bottom should easily give enough slack to clear a lip.
 
singlespeed":1nxfcuip said:
If theres a lip on the disc, you will need to push the caliper piston in sufficiently so the pads can slip over the lip and off the disc.

Don't go ramming a screw driver down next to the piston as you will probably damage the piston seal boot.
With a lever (flat blade screw driver) lever the caliper against the pad carrier bracket where the retaining spring normaly goes between the two bits. A bit top and bottom should easily give enough slack to clear a lip.

That's where i meant
 
Top