reinforced lower engine mount

Twingo Forum

Help Support Twingo Forum:

This site may earn a commission from merchant affiliate links, including eBay, Amazon, and others.

frediiii

Well-known member
Joined
Feb 13, 2011
Messages
492
Reaction score
0
Location
Vienna, Austria
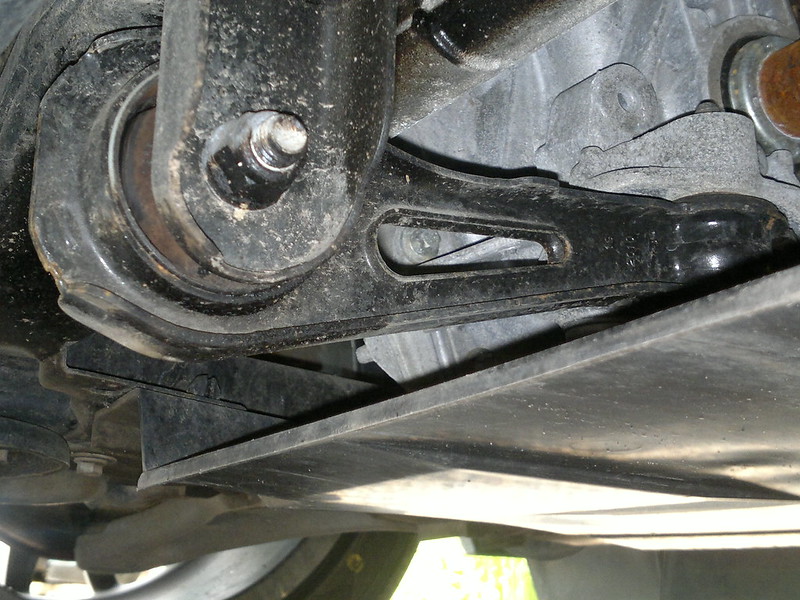
as I managed to wear the third dogbone in two years and there are still no PU replacements around, I decided to use an old clio-drivers trick to make it more rigid. just fill the wobbly end entirely with windscreen athesive... this supports the stock rubber-mount and stiffens it up nicely.

less engine movement, more fun.

IMG_20110510_205343.jpg


IMG_20110510_205333.jpg


did this yesterday evening. I'd recommend to let it dry for at least 24h. when I first did this on my old clio valver, I was in a hurry and drove off with a half dried one. had to redo the whole procedure as the glue squished out on the sides :)

I'll mount it today and will report if I feel the difference. I can't move the metal bit by hand as I could with the stock-rubber, so I think there will be an improvement...
 
Interesting.... let us know how much or if any improvement it makes. i do like a good old DIY improvement :D
 
Twingogeekeo":3bpj08pc said:
Ive never heard or seen that done before is it like a silcone?

it's the stuff you use when you replace a windscreen to glue it to the window frame. it can be compared to silicone. stays flexible, but gets much harder when dry and won't burst...

<edit>btw: thanks for the partnumber, karl :)</edit>
 
fitted it yesterday and took the twingo for a spin... in a word: magnificent. engine seems to sit much firmer now - allowing smoother gearchanges and better throttle control while cornering (it tended to understeer if when you lifted the throttle in corners as the engine started wobbling causing the torque applied to the wheels being inconsistent)

verdict: cheap mod with lots of potential
 
Is the part easily to remove / replace?
 
yeah - did it on the parkinglot in ~30 minutes... all you have to do is remove 10 screws from the plastic cover underneath the engine and then unscrew the two 18mm bolts from the dogbone
 
frediiii":1n1gkybg said:
yeah - did it on the parkinglot in ~30 minutes... all you have to do is remove 10 screws from the plastic cover underneath the engine and then unscrew the two 18mm bolts from the dogbone

Cool.

Whenever I hear "engine mount" mentioned I always assume an engine out job is required.
 
how you finding the drive after a while? mine feels harsh with the gear changes, gets a while to get use too :(
 
quite pleasing I have to say. it's stiffer and the engine feels more ...attached... easier to deliver the right amount of torque to the wheels without loosing grip. I feel a little vibrating in idle but nothing compared to what you would feel with a PU mount or... well - let's say a custom welded reinforcement bar :)
 
Ive been giving this a bit of thought recently, ready for the engine mods.

The stock lower mounting (dogbone) has a lot of air space in there. Great for a quiet and vibration free ride but not so brilliant at keeping the engine in the same place. Watch your gear stick whilst accelerating and then lifting off.

7521040712_e7f09d8389_c_d.jpg


Devcon Flexane® 80 Liquid
Castable, non-shrinking, medium-viscosity (10,000 cps) urethane compound for making rugged, flexible molds, forming dies, cast parts, non-scratching holding fixtures and abrasion-and noise-resistant linings, as well as for encapsulating parts.


KEY FEATURES
•Two-component compound easy to mix and pour
•Cures at room temperature to a semi-rigid rubber material
•Makes precision molds that faithfully reproduce detail
•Listed under NSN#8030-00-144-9756
•Returns to its original shape after 350% elongation
•Ten-hour demolding time
At 80 shore, it should be similar to the poly bushes from the likes of powerflex/superflex and could be poured into the vacant bush space after removing the original rubber or adding over it. Being a two part mix wouldn't give problems with curring a larger volume.
 
Get this a good write up and in how to thread bud it's great idea and defo Guna do it to mine when it starts to wear!
 
actually my reinforced mount is back to standard again, as all the added athesive has vanished over the last 14 months. next mount will have the stock rubber removed and completely filled with more rigid rubber. I'm not sure about PU, as it's really quite harsh...
 
frediiii":4yuxvr0z said:
actually my reinforced mount is back to standard again, as all the added athesive has vanished over the last 14 months. next mount will have the stock rubber removed and completely filled with more rigid rubber. I'm not sure about PU, as it's really quite harsh...
thanks Fredi. That makes the decision easier that full removal of the original rubber is needed.

Flexane is avaliable in three dirrerent grades 60, 80 and 94. We used to apply 94 grade to the spent links bay on the Tornado aircraft to absorb the blows from the ejected brass and links when the gun was fired and it all went into a storage compartment. 94 is rather tough and solid, so probably unsuitable for a mount.

I'm torn between the 60 or 80. However, voids could be moulded into the bush or, holes drilled to soften it if 80 was too harsh as a solid casting but it wouldn't then have the samme structural strength of a solid piece. Oh decisions :?
 
singlespeed":2ssxx79e said:
. We used to apply 94 grade to the spent links bay on the Tornado aircraft to absorb the blows from the ejected brass and links when the gun was fired and it all went into a storage compartment.

pics of the beast? :shock:
 
Top